ok, so I didn't realize that they way I make my hamburgers is actually a unique way until I had a bunch of friends over. I was making hamburgers, and we ran out so I had to put another batch together so that I could eat as well. So I started putting them together and realized that all the women were in there watching me with awed expressions. (we had like 13 adults there or something like that) So here is my recipe for great hamburgers.
so take your standard ground hamburger what ever % fat you want because I just go for the cheapest in the store at the time. Add a bit of Worcestershire sauce, I just kinda dump. Probably about a tablespoon per pound, but I couldn't tell you sorry. Then the real trick is to add finely shredded cheese. I think that mozzarella is the best, but cheddar or montery or anything you have is just as good. The amount, who knows again. probably about a half cup per pound, but that may be a bit much. Now get those hands disgusting by mixxing this up. Next just cook them up. I just found that the cheese makes it more moist and fall apart so nice while you eat it, but not while you cook it. I do put a peice of sliced cheese on top just before it is done so that it will melt on top.
Hopefully this works for you, and if it doesn't work out the first time, tweek as it needs to be. Let me know if you have any other things you like to do to improve your hamburgers.
Showing posts with label Food Tips. Show all posts
Showing posts with label Food Tips. Show all posts
Friday, October 10, 2008

Thursday, August 28, 2008
Wedding Cake
Ok, so I was asked to put together Brittney's wedding cake for the luncheon. So I had a hard time trying to figure out how to make it half fake to try to save money. I know, styrofoam is the right thing to use right, no it was going to cost quite a bit to do that, so I had to come up with something else. Finally my wonderful friend Anna told me to use rice crispy treats. It was such a wonderful idea!! So I made the bottom and middle tiers out of the rice crispy treat and decorated them with regular frosting .
.
I was trying to figure out how to decorate it, and another wonderful friend of mine, Sherrie, was helping me brainstorm ideas. We came up with making the middle tier white while making the other 2 brown. We just couldn't bring our selves to make a green cake. (Brown and green were her colors) So then Sherrie suggested writing their names on the white tier. She wanted to do White frosting, but I suggested a realy light green, and I think it turned out ok with it being green. We worked on the white teir a week before because Sherrie was going out of town for the whole week before the wedding. Luckily she was so nice to let me freeze it in her big empty freezer, rather than having it subjected to the rath of my children .
.
The next week I worked on the bottom teir, making 4 batches of rice crispy treats just to make the structure. Another great suggestion from Sherrie was to make a ribbon rather than make my verry shakey hands do piping all over it. I found a nice thick white ribbon and a small green ribbon. I hot glued the green one in 2 strips all down the white one. Then I fashioned a flat bow to go over the seam of ribbon. It was nice that the "cake" was solid enough to just use straight pins to hold the ribbon on it.


 Yeah, that worked GREAT!! Then on Thursday before the big day I baked the cake, chocolate of course. That is basicly all I did that whole day. Friday was decorating day. It's amazing how much time it takes to get the frosting smooth and even over a small (and harder over a large) cake. Finally I was happy enough with the smoothness, but had to wait until it set enough to do the border. Then sit even more before I could put the ribbon on. Yes this was an ALL day thing, and somehow the girls didn't hurt it. MIRACLE!!!!
Then Saturday was the big day. I didn't realize that I had gotten the wrong size of box for the base, so it was sitting open the whole morning. I asked my grandparents to transport me because I trusted them in their driving and lack of items that could hurt the cake for the morning.
After pictures, my grandparents and I hurried back to the hotel where the luncheon was at and put the cake together. There was a slight causulty with the hearts next to the names, but I don't think anyone noticed. I quickly put it together, scaring the spectators a time or two with the placements and holding the cakes, but nothing big happened. Once it was done I was so happy to be free of it.


After the cake cutting I shoved it all back into boxes, looking less deliciouse than before and got it home. Everyone liked it, and it worked out great, even though the pictures show all of it's flaws. Oh well, it was dark enough in the that I didn't mind too much.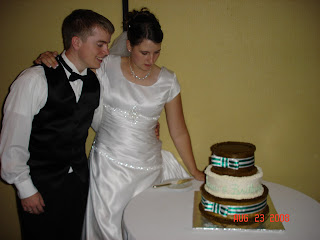
 .
.
I was trying to figure out how to decorate it, and another wonderful friend of mine, Sherrie, was helping me brainstorm ideas. We came up with making the middle tier white while making the other 2 brown. We just couldn't bring our selves to make a green cake. (Brown and green were her colors) So then Sherrie suggested writing their names on the white tier. She wanted to do White frosting, but I suggested a realy light green, and I think it turned out ok with it being green. We worked on the white teir a week before because Sherrie was going out of town for the whole week before the wedding. Luckily she was so nice to let me freeze it in her big empty freezer, rather than having it subjected to the rath of my children
 .
.
The next week I worked on the bottom teir, making 4 batches of rice crispy treats just to make the structure. Another great suggestion from Sherrie was to make a ribbon rather than make my verry shakey hands do piping all over it. I found a nice thick white ribbon and a small green ribbon. I hot glued the green one in 2 strips all down the white one. Then I fashioned a flat bow to go over the seam of ribbon. It was nice that the "cake" was solid enough to just use straight pins to hold the ribbon on it.


 Yeah, that worked GREAT!! Then on Thursday before the big day I baked the cake, chocolate of course. That is basicly all I did that whole day. Friday was decorating day. It's amazing how much time it takes to get the frosting smooth and even over a small (and harder over a large) cake. Finally I was happy enough with the smoothness, but had to wait until it set enough to do the border. Then sit even more before I could put the ribbon on. Yes this was an ALL day thing, and somehow the girls didn't hurt it. MIRACLE!!!!
 Then Saturday was the big day. I didn't realize that I had gotten the wrong size of box for the base, so it was sitting open the whole morning. I asked my grandparents to transport me because I trusted them in their driving and lack of items that could hurt the cake for the morning.
After pictures, my grandparents and I hurried back to the hotel where the luncheon was at and put the cake together. There was a slight causulty with the hearts next to the names, but I don't think anyone noticed. I quickly put it together, scaring the spectators a time or two with the placements and holding the cakes, but nothing big happened. Once it was done I was so happy to be free of it.


After the cake cutting I shoved it all back into boxes, looking less deliciouse than before and got it home. Everyone liked it, and it worked out great, even though the pictures show all of it's flaws. Oh well, it was dark enough in the that I didn't mind too much.

Wednesday, August 13, 2008
Apripops
Ok, I know it has been a long time, but while my pictures copy over to my computer I might as well put in a food tip.
I got this from a great friend of mine that is just loving to do all this fruit and veggie preserving that I am enjoying right now. We are both teaching each other a lot. So we are both over run with Apricots, so to finish up some puree that we both had, so put it in her Popsicle container and froze it like popsicles. Add enough sugar to your puree to make it sweet enough to enjoy. They come out great, and are a healthy alternative. It also uses up some of the excess puree. Also fresh home made apricot jam is delicious. I have also made some fruit leather, and am hoping to maybe bottle some today, but I am not sure how to yet. Good luck and happy cooking.
I got this from a great friend of mine that is just loving to do all this fruit and veggie preserving that I am enjoying right now. We are both teaching each other a lot. So we are both over run with Apricots, so to finish up some puree that we both had, so put it in her Popsicle container and froze it like popsicles. Add enough sugar to your puree to make it sweet enough to enjoy. They come out great, and are a healthy alternative. It also uses up some of the excess puree. Also fresh home made apricot jam is delicious. I have also made some fruit leather, and am hoping to maybe bottle some today, but I am not sure how to yet. Good luck and happy cooking.
Friday, July 11, 2008
PB Cups
So I know this isn't much of a tip, just a favorite recipe. I have loved making these PB Cups for years, and many of you have tried them so you know why.
PB Cups
1/2 cup Butter (softened)
1/2 cup Peanut Butter
1/2 pkg Gram Crackers (the plastic pkgs in the boxes)
2-3 cups (I think, I don't measure this part) powdered sugar.
Mix all of those together until you get about a cookie dough consistency. Don't get it too dry or it will be hard to work with.
Next take 1/3 pkg chocolate chips and melt them in the microwave about 1 min. Stir until melted. Pour the chocolate in a zip-seal baggy, close the top, and snip the corner off to pipe chocolate into the Silicone Floral Cup Cake Pan (yes that is a PC product). After putting a thin layer down, either use your finger to spread it around, or tap the side of the pan to help smooth it out. Place the pan in the fridge for a half hour or more to set the chocolate.
Take a small scoop and put one scoop of peanut butter mixture in each chocolate base. Use the Mini-tart shaper to press down peanut butter to make it even in the cups. Melt the rest of the bag of chocolate chips in microwave as before. Using the same baggy, drizzle more chocolate over the peanut butter mixture. Tap down the side and cover trouble spots as needed. Place in the fridge again to set the chocolate again.
When the chocolate is all set, pop out the individual cups and serve. One suggestion is to have some milk handy because you are going to need it.
If you don't have the cupcake pan and you are just needing the sugar rush, you can just push the mixture flat in a cake pan or small cookie sheet and spread the melted chocolate on top, but that isn't and pretty.
PB Cups
1/2 cup Butter (softened)
1/2 cup Peanut Butter
1/2 pkg Gram Crackers (the plastic pkgs in the boxes)
2-3 cups (I think, I don't measure this part) powdered sugar.
Mix all of those together until you get about a cookie dough consistency. Don't get it too dry or it will be hard to work with.
Next take 1/3 pkg chocolate chips and melt them in the microwave about 1 min. Stir until melted. Pour the chocolate in a zip-seal baggy, close the top, and snip the corner off to pipe chocolate into the Silicone Floral Cup Cake Pan (yes that is a PC product). After putting a thin layer down, either use your finger to spread it around, or tap the side of the pan to help smooth it out. Place the pan in the fridge for a half hour or more to set the chocolate.
Take a small scoop and put one scoop of peanut butter mixture in each chocolate base. Use the Mini-tart shaper to press down peanut butter to make it even in the cups. Melt the rest of the bag of chocolate chips in microwave as before. Using the same baggy, drizzle more chocolate over the peanut butter mixture. Tap down the side and cover trouble spots as needed. Place in the fridge again to set the chocolate again.
When the chocolate is all set, pop out the individual cups and serve. One suggestion is to have some milk handy because you are going to need it.
If you don't have the cupcake pan and you are just needing the sugar rush, you can just push the mixture flat in a cake pan or small cookie sheet and spread the melted chocolate on top, but that isn't and pretty.
Friday, June 27, 2008
Fancy Food
So last night I was trying to figure out dinner as is the usual afternoon activity. So I had some boneless pork ribs in the fridge that need to be used, so I threw them in the oven with some citrus and basil rub for a few hours. Then the problem is what do you make with them? I thought that rice would be nice, but not just plain rice would do. I decided to jazz it up with some garlic and basil. That turned out great and felt so fancy. I had gotten some artisan bread from Macey's for free so I cut a few slices of that with some honey butter, and corn on the cob. If felt like such a fancy restraunty dinner but really I was just using up stuff in my fridge that was about to go bad. I was just excited that I could make something like that so quick and easy, it has always been a dream of mine to get trained in culinary arts. I think that I just watch too much food network too.
So because of that dinner I made last night I thought that I would try to do cooking tips on my blog since that is something I love to do. Hopefully they will turn out good, and if you try one of my tips, please let me know how they turn out. I will be suggesting Pampered Chef products with all of the tips since I sell them and have them in my home. I will also state if I have tried this tip before or if I just think it might work. If you try one of my I think it might work, please let me know how it went.
So for the first one, the rice is a good way to start. If you don't want bland rice, try adding some flavors during the cooking. For a simple solution add chicken/vegetable stock instead of water. You could add your favorite herbs like I did last night. I also thought it might be fun to try adding some carrots, squash (one of the harder varieties), or sweet potatoes to it and see what I got out of it. I use the Rice Cooker Plus to cook my rice because it take the same amount of time as a rice cooker, but it is so much easier to clean and leaves the counter clear for other food prep.
Good luck.
So because of that dinner I made last night I thought that I would try to do cooking tips on my blog since that is something I love to do. Hopefully they will turn out good, and if you try one of my tips, please let me know how they turn out. I will be suggesting Pampered Chef products with all of the tips since I sell them and have them in my home. I will also state if I have tried this tip before or if I just think it might work. If you try one of my I think it might work, please let me know how it went.
So for the first one, the rice is a good way to start. If you don't want bland rice, try adding some flavors during the cooking. For a simple solution add chicken/vegetable stock instead of water. You could add your favorite herbs like I did last night. I also thought it might be fun to try adding some carrots, squash (one of the harder varieties), or sweet potatoes to it and see what I got out of it. I use the Rice Cooker Plus to cook my rice because it take the same amount of time as a rice cooker, but it is so much easier to clean and leaves the counter clear for other food prep.
Good luck.
Subscribe to:
Posts (Atom)